Today I want to talk to you about rigging using Blender. The rigging is the operation that lets us have in second life an outfit that adheres perfectly to our character, that is, to our avatar, and that follows the avatar’s movements while moving. The ideal would be to have a rigging that perfectly follows the avatar’s movement even while dancing, therefore making any movement. However, this kind of rigging would take hours, would certainly be very demanding, and we could call it real art.
In most cases, stores don’t make this kind of rigging, but a simple rigging allows the dress to move following the avatar’s movements without being too precise. Alphas are provided for the dress so that if there were any imperfections in the movement, they would be corrected by the presence of the alpha. A perfectly rigged dress would not require the presence of an alpha. Now let’s see how to rig a dress, and in particular, in this tutorial, we see quick rigging. I was surprised to find out how many stores use this system which, although fast, does not guarantee enough precision to say that the rigging is perfect.
At the moment, I’m giving priority to quick rigging because in most cases, it can be sufficient, especially if we are talking about tops or t-shirts; certainly, this rigging method is not enough if we want to rig a full dress and we are in the presence of a skirt, for example, because in this case, it will undoubtedly be necessary to make adjustments. After all, otherwise, the dress would not fit with precision following the movements of the avatar. So let’s proceed to see how you can rig a top.
Firstly, download the top model obj → download.
Import the obj model made in Marvelous Designer into Blender on a new layer (it is essential to import it on a separate layer from the body). Pressing SHIFT and the different layers makes it possible to display more than one at the same time. If you have already imported it before, select the mesh you want to put on a separate layer, click M and select the layer you want to move the mesh to.
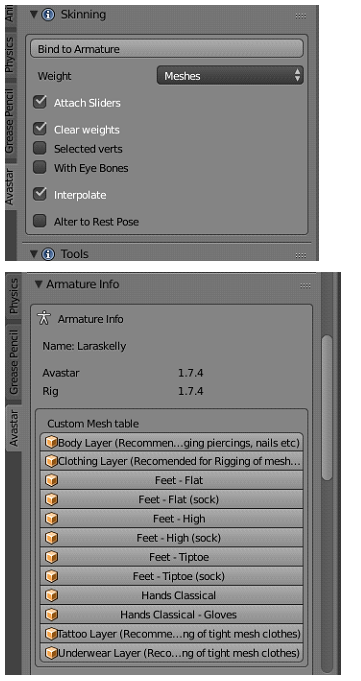
Go to object mode; at this point, you need to proceed with Bind to Armature, but there are some important settings for rigging and making sure the mesh is also fitted.
Select the suit to be rigged and the armature in Maitreya Dev Kit.
Then go to Avastar >> Skinning >>under “bind to the armature,” select “meshes,” and under “armature info,” select “Clothing Layer” (recommended for clothes).
Deselect all >> reselect: mesh to be rigged+armature.
Now do the “bind to the armature.”

The mesh is now attached to the armature and is fitted, but the weights need to be adjusted.
NB. In order to see the weights, click on deform bones, which is selected after V A:

In weight tools click on smooth. Set Factor to 1, so that you smooth only 3-4 times per bones.

On the right, move to the vertex tab, remove all shape keys (select and -) and in the vertex group for each bones, make smooth (left) 4 times.
Press the key combination A V. The rigging is finished.
Now we need to solidify the mesh.
On the right, click on the spanner and add as modifier (solidify). The value we need to act on is Thickn. A value I like is 0.0010.

Now just export the dae with Avastar and the mesh is ready for import.
My Youtube Video Tutorial
Sign up for our newsletter now!


